Coverlock Techniques: Tie Belts, Belt Loops, and Piped Pockets
CREATIVATE Bildung
Juli 01, 2025
The difference between a good garment and a great one is almost always in the details. These three techniques — a textured tie belt, custom belt loops, and piped pocket edges — show just how much your Pfaff® admire™ air 7000 coverlock machine can do beyond basic seaming. Each one adds a distinctive, designer-quality touch that's easier to achieve than it looks.
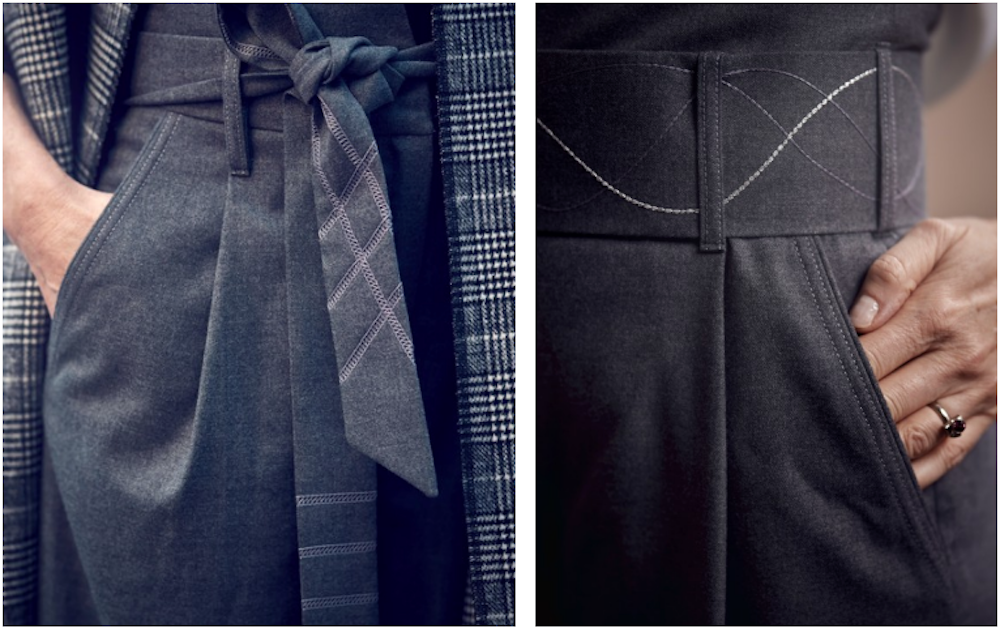
Tie Belt — Using the Reverse Side of the Coverstitch
One of the most creative tricks with coverstitch is flipping it over. The reverse side of a Wide or Narrow Double Coverstitch — or a Triple Coverstitch — produces a beautifully textured looper thread pattern that makes a striking embellishment. The belt shown here uses the Wide Coverstitch with 30wt cotton thread in the looper for rich texture, and regular serger thread in the needles.
To make the belt:
- Determine your finished belt width and length, factoring in the extra length needed for tying. Add seam allowances.
- Apply interfacing to the wrong side of the belt fabric if the fabric needs additional stability.
- Using a fabric marker and ruler, draw your stitching guidelines on the wrong side of the fabric in your chosen pattern.
- Place the fabric right side down under the presser foot. Because the right side faces down, the looper stitches will form on the fabric's right side — this is what creates the decorative effect.
- Sew your rows of coverstitch at a moderate speed.


Belt Loops — One Step with the Strap and Belt Loop Foot
Custom belt loops that look perfectly finished — in a single pass. Set the machine for the Wide Double Coverstitch and use the Strap and Belt Loop Foot.
To make the belt loops:
- Cut a fabric strip 1" wide. Calculate the length based on your belt depth, seam allowances, and the number of loops needed. It's easiest to sew one long continuous strip and cut the individual loops to length afterward.
- Cut the leading end of the strip at a 45-degree angle to form a point — this makes it easier to feed into the foot.
- Insert the angled end into the foot's guide with the right side facing up. Pull the strip through the slot and under the foot, extending the tail behind it. Tweezers can be helpful for threading the strip through.
- Snap the foot onto the machine. Slide the strip approximately 2" (5 cm) behind the foot and lower the presser foot. Check that both raw edges are folded under before stitching.
-
Sew the first few stitches, then stop and clip the needle threads close to the foot. Continue sewing at medium speed, holding the fabric strip slightly below the front guide for even feeding. Check the fabric regularly as you sew.
For a bolder look: Use 30wt cotton or topstitching thread in the needles and set a longer stitch length.


Pocket Trim — Piped Edges with the Piping Foot
Piping gives pocket edges and seams a sharp, tailored finish that immediately lifts the look of a garment. You can use purchased piping for convenience, or make your own for a perfectly matched, custom result. The Piping Foot handles both — a groove on the underside guides the cord or piping evenly as you sew.
Machine setup: Set the machine for the 4-thread overlock stitch and snap on the Piping Foot.

To insert piping into a seam:
- Place the piping along the seam line on the right side of your fabric.
- Lay the second fabric piece on top, right sides together, sandwiching the piping between the layers.
- Place the layered fabric under the Piping Foot with the piping sitting in the groove on the underside.
- Sew — the groove guides the piping automatically for a straight, even result.
To make your own piping:
- Cut fabric strips on the bias or crosswire grain, wide enough to wrap around the cord plus seam allowances. A cord size of 2–3mm is recommended.
- Lay the cord along the wrong side of the strip and fold the fabric over it.
- Place the fabric and cord under the Piping Foot with the cord in the groove.
- Sew using the 4-thread overlock stitch.