Celebrate & Create: Juneteenth Flag Patch DIY
Emily McGinley
June 18, 2025
Juneteenth: A Patch with Powerful History
In this guide, you'll discover how to easily make your own commemorative patch to celebrate with creativity and pride.
The History Behind Juneteenth: Juneteenth marks the second independence day in United States’ history and is the celebration of the effective end of slavery. In January 1863, the Emancipation Proclamation declared enslaved African Americans legally free. However, many in Confederate states would remain enslaved. Texas was the last state to free enslaved people; over two and a half years after the Emancipation Proclimation was declared by Abraham Lincoln and months after the Thirteenth Amendment to the Constitution was passed.
On June 19, 1865, around 2,000 Union troops arrived in Galveston, Texas to free over 250,000 people who were considered the last group of enslaved people in the United States under Confederate rule. This is how the name came about, Juneteenth is a mix of June and nineteenth to commemorate the date.
Juneteenth is considered the longest-running African American holiday and officially became a U.S. federal holiday June 17, 2021, making it the first U.S. federal holiday to be signed into legislation in the 21st century.
The Celebrations: Today, we celebrate Juneteenth to recognize those who were enslaved long after the Emancipation Proclamation, and to spread knowledge and appreciation for Black history and culture. People across the United State celebrate the day with others at cookouts with traditional food, themed parades, block parties, and more.
About the Flag
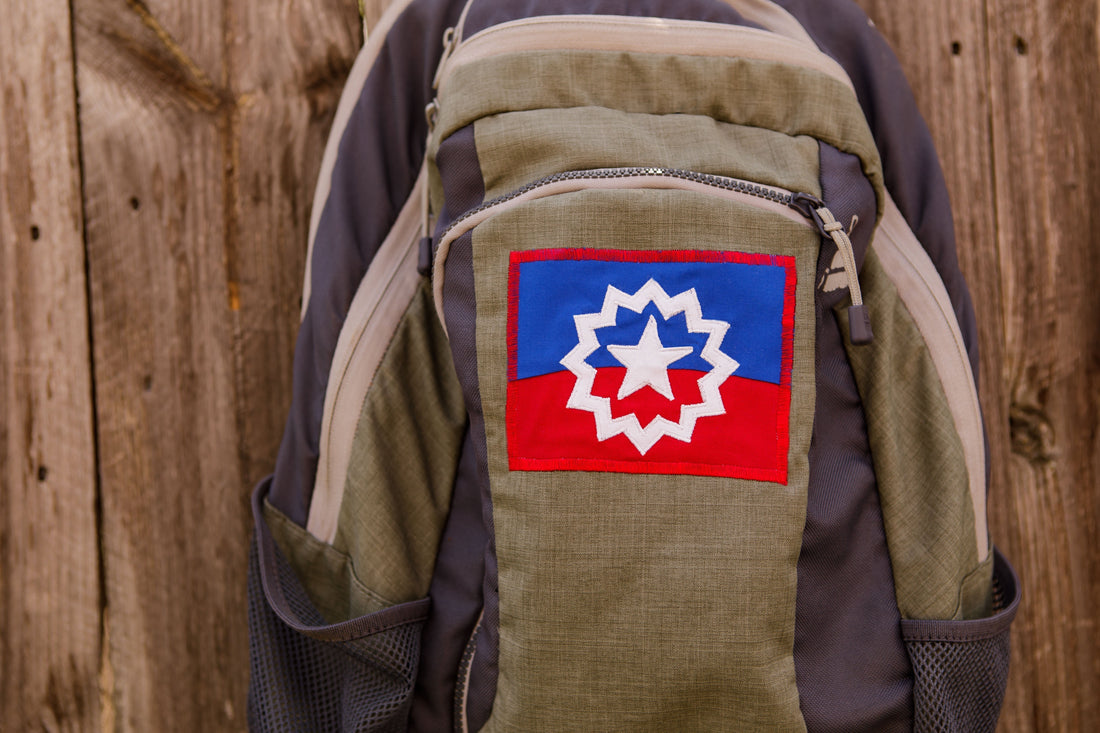
While the Juneteenth flag is a newer symbol, having been created in 1997, it is steeped in symbolism. The flag was a collaboration between Ben Haith, founder of the National Juneteenth Celebration Foundation, and illustrator Lisa Jeanne Graf. Then in 2000 the flag was revised to also include the date. All design choices were a deliberate choice to represent and respect that historic event.
- Colors: Red, White & Blue: Same colors as the U.S. flag to remind us that enslaved people and their descendants are Americans.
- Center Star: Represents Texas—the “Lone Star State”—where the last group was freed.
- Star Symbolism: Also reflects freedom for all 50 states.
- Burst: A new beginning. A nova, symbolizing a bright new beginning for those once enslaved.
- Curved Arc: Like a horizon, it stands for hope and future opportunities for Black Americans.
Tools & Accessories
- Iron
- Ironing board
- Scissors
- Optional:
- Open-toe presser foot
Materials
- Printable Template - Download Here
- Red woven fabric (cotton recommended)
- Blue woven fabric (cotton recommended)
- White woven fabric (cotton recommended)
- Double-sided fusible webbing
- Tear-away stabilizer
- Fabric marking tool
- Pencil
- Red or blue all-purpose thread
- White embroidery thread
Optional:-
- Bobbin thread
- Red or blue embroidery thread
-
Make your own Juneteenth Flag Patch
|
Step 1: Print the provided template and cut out all shapes.
|
| Step 2: Place the background shapes on the color fabric indicated. Use your fabric marking tool to trace around the shapes. |
Step 3: Cut along the outlines you just traced. |
|
Step 4: Thread the machine with red or blue in the top and bobbin.
|
|
Step 5: Since this is technically considered “curved piecing” due to the horizon shape, pinning the fabric will not properly align it for sewing. To start sewing, line up one end with right-sides together. Place this under the foot and sewing a small amount 1”-2” (2-5cm) with a ¼” seam allowance. |
|
Step 6: After sewing the small amount, put the needle down in the fabric, lift the presser foot, and adjust your fabric so the edges in front of your foot line up. Lower the foot to continue sewing the curve in small increments, realigning the edges of the fabric as you sew. |
|
Step 7: When your curved background is sewn, cut small clips into the curve so it will lay flat. Iron the seam towards the blue.
|
|
Step 8: Take your star and burst template pieces and trace these on the paper side of the double-sided fusible webbing in pencil. |
|
Step 9: Roughly cut these shapes out of the fusible webbing. |
|
Step 10: Follow the manufacturer’s instructions and iron these shapes to the wrong-side of your white fabric. Tip: Use a spare piece of plain cotton as a pressing cloth between your project and the iron to ensure the iron doesn’t get any sticky residue from the fusible webbing.
|
|
Step 11: Carefully cut your fabric along the edges of the fused shapes. |
|
Step 12: Find the center of your sewn background and place the center star there after removing the paper from the webbing. Iron in place.
|
|
Step 13: Place the outer burst shape around the star. Make sure the top point of the star lines up with a point on the burst and iron in place. |
|
Step 14: Switch The top thread to the white embroidery thread and the bobbin thread can match or be white bobbin thread. |
|
Step 15: Select a medium/thin satin stitch or a zig-zag stitch with lower width and length settings. Tip: Practice on scrap fabric to feel comfortable with your selection, make sure you place stabilizer behind the area you are stitching. |
|
Step 16: Place stabilizer behind your background, stitch over all exposed edges of the star and the burst. |
|
Step 17: Remove the excess stabilizer from the back.
|
|
Step 18: Trace the outline of your patch onto the paper side of double-sided fusible webbing and cut out. |
|
Step 19: Press this to the back of your patch and then remove the paper backing. |
|
Step 20: Place the patch on your item and iron it in place. |
|
Step 21: Select a satin stitch or a zig-zag stitch with lower length settings. Tip: The width of this satin stitch can be wider than what was used on the stars because it is not as small and there aren’t’ small details being accentuated by the stitch. |
|
Step 22: Pace stabilizer behind your project and stitch around the outside of the patch, covering the raw edges. Remove excess stabilizer when done. |


