Stitch Editor - with Embroidery Software
CREATIVATE Education
June 06, 2025
Stitch Editor
Edit and customize individual stitches in your embroidery designs.
Adjust individual stitches in your embroidery designs.
- Select a portion of the design and duplicate or delete it.
- Insert new stitches or machine commands into the design.
- Use the morphing tools to twist and distort your design.
- Select parts of your design and adjust the stitch properties.
- Use the Density Advisor to view and reduce the density of the design
- Remove unnecessary stitches using the Stitch Optimizer.
|
Go to Design Catalog to get file here.
Click on Send to mySewnet Enable Device and send to the software on your computer. The software will open a new window.
Note: All designs are part of the Silver or Platinum subscription. If you do not have a subscription you can purchase the design. |
|
|
In the Hoop Selection pop-up choose 360mm x 260mm Hoop. Orientation Natural. Click OK |

|
|
Click on Edit Design to open Stitch Editor.
|
 |
|
Use the different Select tools to remove the parts you don't want: Box Select Freehand Select Point Select Click Delete. |
|
|
When there are smaller pieces of stitches left, it is easier to change to 2D View. |
|
|
Click on the View tab. Choose 2D view with Stitch Points.
|
|
|
Go back to the Home Tab and zoom in on the area you want to edit.
|
|
|
Use the Select Stitches tool to click on the stitch points to remove them. |
|
|
Use the Freehand Select to mark the smaller flowers and move them closer to the large one. Duplicate the smaller flower and place it as well. |
|
|
Go to the Object tab and click on the flower. Make sure it is the fill pattern that is highlighted. |
|
|
Right click and choose Edit Pattern Fill. Choose the pattern fill of your choice. |
 |
|
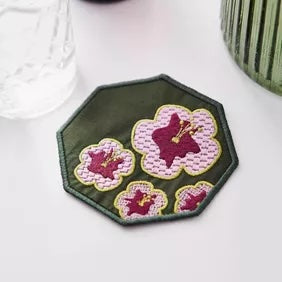
Edit the Pattern Fills on all four flowers. |
|
|
Draw a square around the flowers and move the octagon to be slightly off the designs. You can change the size by clicking the and dragging on the white corners. |
|
|
Choose Satin as the stitch type. |
|
|
Click on Options and change the width to 2.5mm |
 |
|
Click External Border |
|
|
The satin border appears and the parts of the embroidery that is outside of the border will be deleted |
|
|
To save the design click on File and Save As. This will save a .vp4 file that is fully editable again if you want to continue working with it. |
 |
|
If you want a different format you use the Export instead. |
|
|
Here you will get a list of all available formats and you can choose the format you need for your embroidery machine. |
|
|
On the Export pop-up you also get additional choices under Optimize for Sewing. These are settings you can change in Configure. |
|
|
If you open Configure under the File menu and the Export Tab you can select your options. Removing the checkmarks for Combine and Color Sort helps if you want to decide when to do that manually before Export. This is very useful when working with Appliqué designs where you want to keep the number of color blocks for the technique steps. When you have made the changes click Apply and OK. |
|
|
Under File and Print, you will get the option to print a template. This is perfect if you want to experiment with the placement or see how the design aligns. Make sure the Design Scale is set to 100%
You can choose what information you want on your template by checking/unchecking the boxes under Print Information. |
 |


