Mastering Quilt Sashing & Borders
CREATIVATE Education
July 16, 2025
Quilting is an art form that weaves together creativity, tradition, and personal expression. Among the many techniques available to quilters, borders and sashing stand out as powerful tools to elevate both the beauty and structure of a quilt.
These elements not only frame intricate patterns and designs but also add depth, dimension, and a touch of elegance to the finished piece.
- Borders serve as the final flourish, providing a polished edge that enhances the overall aesthetic. Whether simple or elaborate, solid or pieced, borders are highly versatile—allowing quilters to experiment with a variety of styles and colors. They can unify disparate blocks, create a cohesive look, and highlight specific motifs within the quilt.
- Sashing, on the other hand, acts as a separator between blocks, offering a visual break that allows each block to stand out. It brings a sense of order and balance, guiding the viewer’s eye across the quilt and contributing to a harmonious flow. Sashing can also introduce contrast, complement the color scheme, or incorporate additional patterns—making it a dynamic and integral part of quilt design.
Design Aspects
Together, borders and sashing transform a collection of blocks into a unified work of art, showcasing the quilter’s skill and creative vision.
In this how-to guide, I’ll walk you through the design possibilities CREATIVATE™ Quilting Software offers for working with borders and sashing.
To follow along in this How to you can open a 2x2 block quilt in the software:
| Step 1: Open the quilting software |  |
| Step 2 Click on Load a Preset Quilt Layout. |
 
|
| Step 3: Select the 2x2 layout. |  |
You should now see a basic quilt layout.
Note: I changed the color of the blocks and border to white for better visual clarity, but this step is optional.
Sashings:


You have three choices here: Cornerstone, Horizontal, or Vertical sashing.
Cornerstone

Horizontal

Vertical

Sashing Border

For all three sashing options—Cornerstone, Horizontal, and Vertical—you have the ability to Include a Sashing Border. This adds an extra row of sashing around the outside of the quilt, giving your design a more structured, framed look. It neatly surrounds the quilt blocks and enhances the overall appearance.

Sashing Width
You can adjust the sashing width from 1–4” (2.5–10 cm). If you select a size outside this range, the software will automatically default to the minimum or maximum allowed size.

Tip: Play around with the width setting to see how different sashing sizes affect your quilt layout and visual balance.
Sashing Fabric Colors
When you select Add Sashing, the default sashing colors will appear in Teal and Turquoise.

To customize the sashing colors:
-
Click the Edit icon in the panel.
-
Select your preferred color from the color picker or fabric palette.

Borders
Now that we've covered sashings, let’s explore Borders!
Borders help bring the quilt blocks together into a cohesive whole. They can be narrow or wide and play a key role in the visual impact of your quilt.
Borders also act as size modifiers, allowing you to enlarge your quilt by adding extra width. Additionally, borders are a great place to showcase a special fabric you don’t want to cut into small pieces.
When I design a quilt, I usually start by selecting the border fabric first, then use the color dots on the fabric selvedge to help choose coordinating fabrics for the blocks.
Border Width

You can adjust the border width from 1–8” (2.5–20 cm). Just like with sashing, if you enter a value outside this range, the system will automatically set it to the nearest valid size.

Tip: Play with the width settings to see how different border sizes change the overall design and balance of your quilt.
You can change the color of the border the same way you change the sashing colors:
-
Click the Edit icon.
-
Choose a new color or fabric to update your design.
Sashing, Borders, and Quilt Size
When you add a border or sashing, it will affect the finished size of your quilt. This is important to keep in mind if you’re aiming for a specific final size.
Always check the finished quilt dimensions after adding borders and/or sashings to ensure your project stays on track.
Example: How Quilt Size Changes
Let’s walk through an example:


Resizing the Quilt to a Specific Measurement
If you want the quilt to be a specific finished size, you can set the total size manually.
In this example, I set the finished size to 26” (65 cm).
The software automatically adjusts all the components proportionally:
-
Block size: 9.59” (24 cm)
-
Sashing width: 1.61” (4 cm)
-
Border width: 2.57” (7 cm)

Proportional Resizing
When you adjust the overall quilt size, all pieces—blocks, sashings, and borders—are resized proportionally. This also affects the individual pieces within each block.
Cutting Tip:
These new measurements can sometimes be tricky to cut by hand. But if you have a SINGER® MOMENTO™ fabric cutter, it’s no problem at all—the machine will cut each piece with precision and accuracy, making assembly smooth and effortless!
Layout Examples
Here are three examples showing how different sashing and border choices affect the overall look of the quilt:
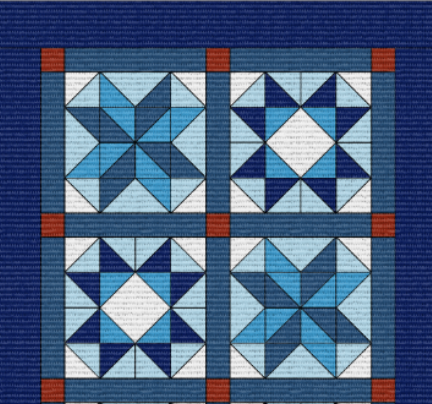
-
Left Quilt:
This is the original sample quilt with the border color changed to navy. The blocks appear a bit crowded, and the designs blend together, making the stars harder to see. -
Middle Quilt:
This version includes cornerstone sashings and a sashing border. The cornerstones add a pop of color and help lift the design visually. The quilt looks more structured and balanced. -
Right Quilt:
This version features horizontal sashing, no outer sashing, and a wider border. The result is a calm, clean appearance where the blocks stand out individually. This layout works well for sample quilts where you want each block to shine on its own.

Once you've finalized your design choices, the fun part begins—bringing it all together.
As we stitch the blocks, sashings, and borders, we’re reminded that quilting is more than a craft—it’s a journey of creativity, patience, and love.
Every piece we add and every seam we sew brings us one step closer to creating something that tells a story—not just of fabric and thread, but of dedication and passion.
Keep quilting. Keep creating. 🧵✨